Saturday, January 26, 2013

Soft-spoken Scratchy Now Screeming with a Spoon N1 Muffler

The legendary Spoon N1 Muffler. A dream part for the inner child in every Honda lover.

I got one at a somewhat cheap price: P9,500 for a slightly modified original 1st Generation Spoon N1.
This particular one is for a sedan, but the owner modified (shortened) the pipe to fit the hatch.

The Gen 1 Spoon N1 Muffler features a matte/flat steel finished body and polished tip -- different from the succeeding generations that have a Spoon badge and 100% polished body.

Here it is when I bought it:


And moments before installing, a closer look. Notice the clean welds? That's what sets it apart from copies/fakes.


Installation time!

Remove the rear bumper so you can easily see what you're doing.


This is an OEM JDM EG6 B16A muffler and pipe set BTW.


OEM vs. Spoon N1


Take off two bolts that connect the muff to the midpipe, then install the Spoon muff. Pretty straightforward if you ask me.


Done!


Looking at the pics, you would say that it is a perfect fit. However, due to the fact that this just a modified part, a portion of the pipe is hitting my LCA whenever I hit bumps on the road so further modification is needed.

Now on to Brodeth. A trusted muffler and pipe fabricator of many car enthusiasts.


The muffler and car while waiting for them to start work:


This is the fit I'm looking at:


I decided to replace the pipe altogether. It hurts to see them cut the pipe, but it's all for the better.
Ouch!

All its glory exposed.


TIG welding it and the finished product.


Now, fitting it into the car:


Finished work!


I don't care whether it lost its value by doing this since I don't plan to sell the muffler anytime soon.
I paid Brodeth a total of P2,500 for everything.
What do you guys think?

Update: Bought a Spoon N1 Gen3. Click here.

Sunday, June 10, 2012

The DIY EG Civic Hatch Power Windows Install

When I begin a project, I always make sure to get all the information I need -- wiring diagrams, pictures, possible problems to encounter, and other stuff that you need to remember.

The site that helped me the most is this: http://repo.jackmoves.com/v/erik/albun31/albun42/
This is more detailed, but I didn't follow everything like the relay and other stuff.

This is the first time I'm taking the fenders off Scratchy so it's a bit challenging. Besides that, the wiring and the installation itself is a breeze especially when you connect/assemble the harness beforehand. By doing so, you will be able to test its functionality first before taking your car apart.

Here are the parts I used and the steps I took to install.

1. JDM Window riser with motor, bought for P3,500 with switch and pigtail harness. Motors should be swapped so that the right motor will be at the left to make the auto up and down function work.


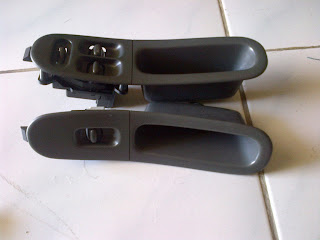
2. Left and right door covers. This is part of the black bricks Gathers interior I bought in 2010 for P19,000. 


...look, a Honda Primo maintenance badge!


3. Window switch to motor harness which should be assembled before hand for easy installation. The best way to assemble this is to match the colors of the wires. I reiterate, you don't need a Honda power window relay for this to work. The gray connector is for the switch, the white is for the motor. You just need to connect all the wires together and the two extra wires are for 12v positive and ground. I used normal automotive wires to connect the two sides.


If you fancy reading diagrams:


4. Take of the fenders of the car. You need to remove the skirts by removing the clips and a screw at the front part, then for the fender you need to remove three bolts on top, and three at the side. You need these off the car run the wires through from the door.


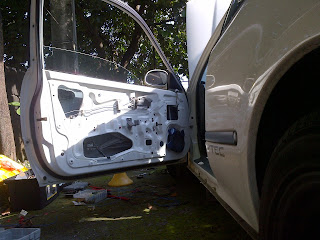
5. Take the interior covers off the doors and you can see the mounting holes. The doors are ready to accept power or manual windows.


6. You need to remove the glass first, use duct tape to hold it while you work on the riser. No need to take the glass off the door. Unscrew and remove the manual riser from the door through the biggest hole.


7. Run all the wires from one side to the other. I used a normal 16ga automotive wire to do this.
Ground the harness to the driver side door, no need to ground the passenger side since + and - signals (2 wires) will come from the driver side wiring.


8. Connect the power wire of the harness directly to a vacant slot in your fusebox. I used a vacant one that turns on only when you turn the key to the "ON" position. You can also choose a slot that turns on at "ACC" position. You can choose any of the two depending on your preference.


You can see here that the option connector C917 for "ON", you can use C919 for "ACC".
9.  Test if it works!


Since this is a JDM power window, driver side switch for left and right are reversed. A good thing is that the auto up and down feature works as it should so I could live with it. You can also wire it as such that you have the correct orientation, but of course, you'll lose the auto up and down with it.

I'll post pictures of the finished install soon.


Saturday, February 25, 2012

Timing Belt Change Turn-out

After calling-up shops to find the best price, I decided to bring my Scratchy to Blacksheep along Imelda Avenue. Their labor price is quite reasonable -- for P2,000, they will change my timing belt, tensioner bearing, cam shaft and crank shaft oil seals, water pump, clutch master, and fix my leaking brake master.

Here are some pics while they tinker with Scratchy:


Here are some pics of the parts I used:


Now, first time opening the valve cover, the sight just made tear -- tears of joy! This is indeed a very fresh engine!


Finished in 4 hours. Work is satisfactory. One thing I'm not happy with is that my brake master still leaks. I suspect they didn't even touch it -- but still billed me for it. :(

Lesson learned is to never leave your car in the shop.

I will still come back to this shop though. I just need to keep a close eye to make sure they do what they are paid to do.